Automating Your TV Downloads
Posted 14 years, 38 weeks ago.
Up until this weekend, I’ve maintained a download/conversion managing system cobbled together with PHP, chewing gum and a paperclip. But when I decided to bring my manager over to my Mac Mini, I decided to put together a new system.
My first thought was to write my own app (since that’s the cool thing to do), but with little time, that didn’t seem feasible. So I turned to Google and over the course of an evening or so, I put together this handy little system that takes my shows from the intertoobs and feeds them directly into my Apple TV without me having to do anything manually.
No really. If you’re a Mac user and you download your TV or whatever, follow this simple guide (that has some not so simple steps, but don’t worry, I’ll explain them).
And so it begins.
UPDATED (16 Feb 2012): I’ve moved the hosting of the AutoConvert.scpt file over to Gist. This new version creates a log file to capture Handbrake output, which is deleted once the conversion is done, and can be used to determine the progress.
UPDATED (26 Feb 2012): I’ve made some additions to AutoConvert.scpt that help to get things processed faster (because iFlicks can run more often) and to help ensure that files are not processed more often than they should be.
UPDATED (15 Jan 2015): If you’re still using this method, and haven’t updated to use iFlicks 2 in place of my applescript, then shame on you. It takes care of detecting the completed downloads, converting (with better handling of compatible video types) and loading into iTunes.
It’s dangerous to go alone. Take this… er… these… things.
You may or may not have some of the things below. You may even have a setup that automatically downloads your torrents for you. That’s cool. There’s room for that, this list assumes we’re starting from scratch.
1. A place to download torrents
For my TV related torrents, I use TVTorrents, which is a private tracker. One of the features of this tracker is it’s RSS Feeds, which you can customise to your needs. I’ll explain how I do this a little later.
Before anyone asks: no, I cannot provide you with an invite to TVTorrents.
2. An automated torrent file downloader
You could download your torrents all manually, but where’s the fun in that? For this I use Automatic by Coding Curious, which admittedly costs US$20. But for those of you who don’t have access to TVTorrents or the like, it has TV subscriptions baked right in, like chocolate chips in a delicious cookie.
If you’re adverse to spending money willy-nilly, you could probably go with something like µTorrent, which covers downloads of torrents via RSS and is also a torrent client.
3. A torrent client
For this I use Transmission. Mostly because it had the configuration options I wanted. Also because it’s little and mostly stays out of my way.
As mentioned previously, you can use µTorrent for downloading torrents, and because it has an RSS feed set up built in, you can skip the need for a separate one.
4. An applescript
This one, cobbled together by me. We’ll need to make a few adjustments to it later.
5. A cron manager
Some people use folder actions or apps like Hazel. I tried all that and it didn’t work right for me. I decided to use crontab, which is built right into OS X. Normally it requires some terminal knowledge, but I’m not that guy. I used CronniX to set it up, GUI style.
6. A conversion tool
So, for basically all my conversion needs, I use HandBrake, cause it’s awesome (words cannot describe). For this process, I use it’s command line version, HandBrakeCLI.
7. A thing to add the details
Ask anyone. I’m as messy as anything in meatspace, but my computer is organised like one of those homes in the fancy magazines. All my digital media has titles, episode numbers, etc. For this, I use iFlicks, because it’s amazing (even if it does cost a little coin).
Download the Media
So for those who do have access to TVTorrents, here’s how I set up my feeds. First off, I tagged shows with either one of two tags: DOWNLOAD HD or DOWNLOAD SD. I think the idea behind this is pretty straightforward.
Then I mades some adjustments to the feed links (using the ‘Favourite Shows’ feed), which help filter the torrents I don’t want, like full seasons, or the wrong format (since one is for HD, and the other for SD). Remember to insert your own digest and hash, or this link won’t work.
HD: http://www.tvtorrents.com/mytaggedRSS?tag=DOWNLOAD+HD&interval=1+week&exclude=(avi%7CSeason.*Complete)&digest=...&hash=...
SD: http://www.tvtorrents.com/mytaggedRSS?tag=DOWNLOAD+SD&interval=1+week&exclude=(mkv%7CSeason.*Complete)&digest=...&hash=...
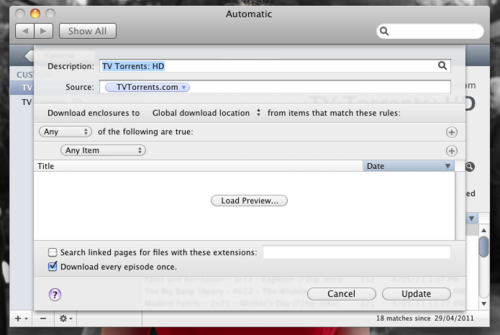
Next, I added each of those links as a custom feed in Automatic (as the source), and set Automatic to refresh every 15 minutes. Eventually it began downloading the torrent files to my Downloads folder.

Adding a feed to Automatic.
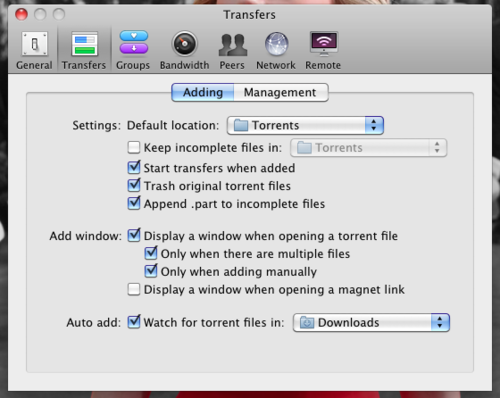
Finally, I set up Transmission to watch for torrent files in my downloads folder. You’ll also want to either turn off the showing of a window when torrents are added, or make it so they’re only shown when you open a torrent manually.
While you’re in there, set up where your media downloads to. You’ll want it somewhere out of the way (probably not your default downloads folder. I set up a new folder in my user folder called “Torrents”. All my torrents download in here, and this is where all the magic happens. Finally, check the option for adding a .part extension to unfinished files. This is important, because our converter will pick up on unfinished downloads otherwise.

How my transfers are set up in Transmission.
So setting up the download of the media is pretty easy. Let’s move on.
NOTE: To do a similar setup in µTorrent, add the feed and then create a smart filter, setting it to download automatically. You’ll need to specify a separate downloading and completed folder, though, because µTorrent doesn’t support the .part extension we need for determining when a download is completed.
Convert the Media
This is where you need the applescript I cobbled together (from a few different sources, in all honesty. I can barely call it ‘mine’). Put the file into the same folder you set up for your media to download into (we’re just gonna call it “the Torrents folder”).
Make sure you have iFlicks and HandBrakeCLI installed too. The location of HandBrakeCLI is important. I put it in the Utilities folder (/Applications/Utilities). If you put it somewhere different, be sure to remember where.
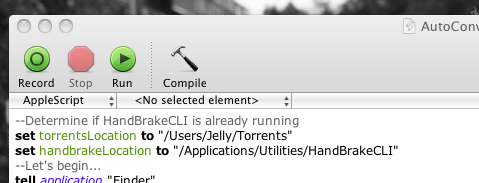
Now, open up the applescript and set the two locations variables. If you’re not sure how to write the location of these items, find and drag the HandBrakeCLI application file (or the Torrents folder) onto the applescript text, it should paste in the location for you. Then just replace the text inside the quotes with whatever it pasted in.

You’ll need to point these variables to the correct locations.
After you compile, it should change your purple text to look more like the picture. Try running it. Assuming you installed both HandBrakeCLI and iFlicks, it should run fine (though it might take a while to complete if you had video files already downloaded, since it’ll try to convert them). If it did, save the file. If not, you either have the locations incorrect, or one of the apps isn’t installed. Check back over what you’ve done and double check everything.
NOTE: I’ve had an issue where the applescript file would get garbled every now and then, and I’m not sure why. If you’re 100% happy with the setup, use the ‘Save As’ dialog to save the file, and check the box labeled ‘Run Only’. Then find the file in Finder, control-click (or right click) and click ‘Get Info’. In the window that opens up, check the ‘Locked’ box and then close everything down. As far as I can tell, this stops the problem.
Automate the Applescript
The final process is setting up the crontab to run your applescript automatically. It’s a fairly simple thing to do. Open up CronniX and click browse, and locate your applescript. It’ll put the location (in quotes) in the text box. Add ‘osascript’ with a space in front of the location. This is a command that will run the applescript.
Now click the “Expert” tab. This will allow you to set the times you want the script to run. Each textfield can either have numbers (multiple can be comma seperated) or a star, which basically means “every”. I want mine to run every 15 minutes, so in the minutes field I write 0,15,30,45, because I want it to run on the 0th minute, the 15th minute, the 30th minute and the 45th minute. Then I’ll set the other fields to have stars, so that it runs every hour of every day of the month of every month… etc. If you don’t know what you’re doing, you’re better off making it the same as mine.

If it looks right, click “Apply” and then “Save”.
And that’s it! Assuming you did it all correctly, your stuff should download and convert automatically. Congratulations!